>New to Crochet?

>Hokey Smokes!  March is flying by and still I have not joined in the celebration of National Crochet Month.  You’d think I could come up with something extraordinary to contribute.  As a professional designer and author I spend most of my time in my own crochet alternate reality.  There are days and weeks on end where I hardly talk to anyone but other crocheters who deign to come out of their own crochet alternate realities.  I have to be reminded that not everybody speaks the language.

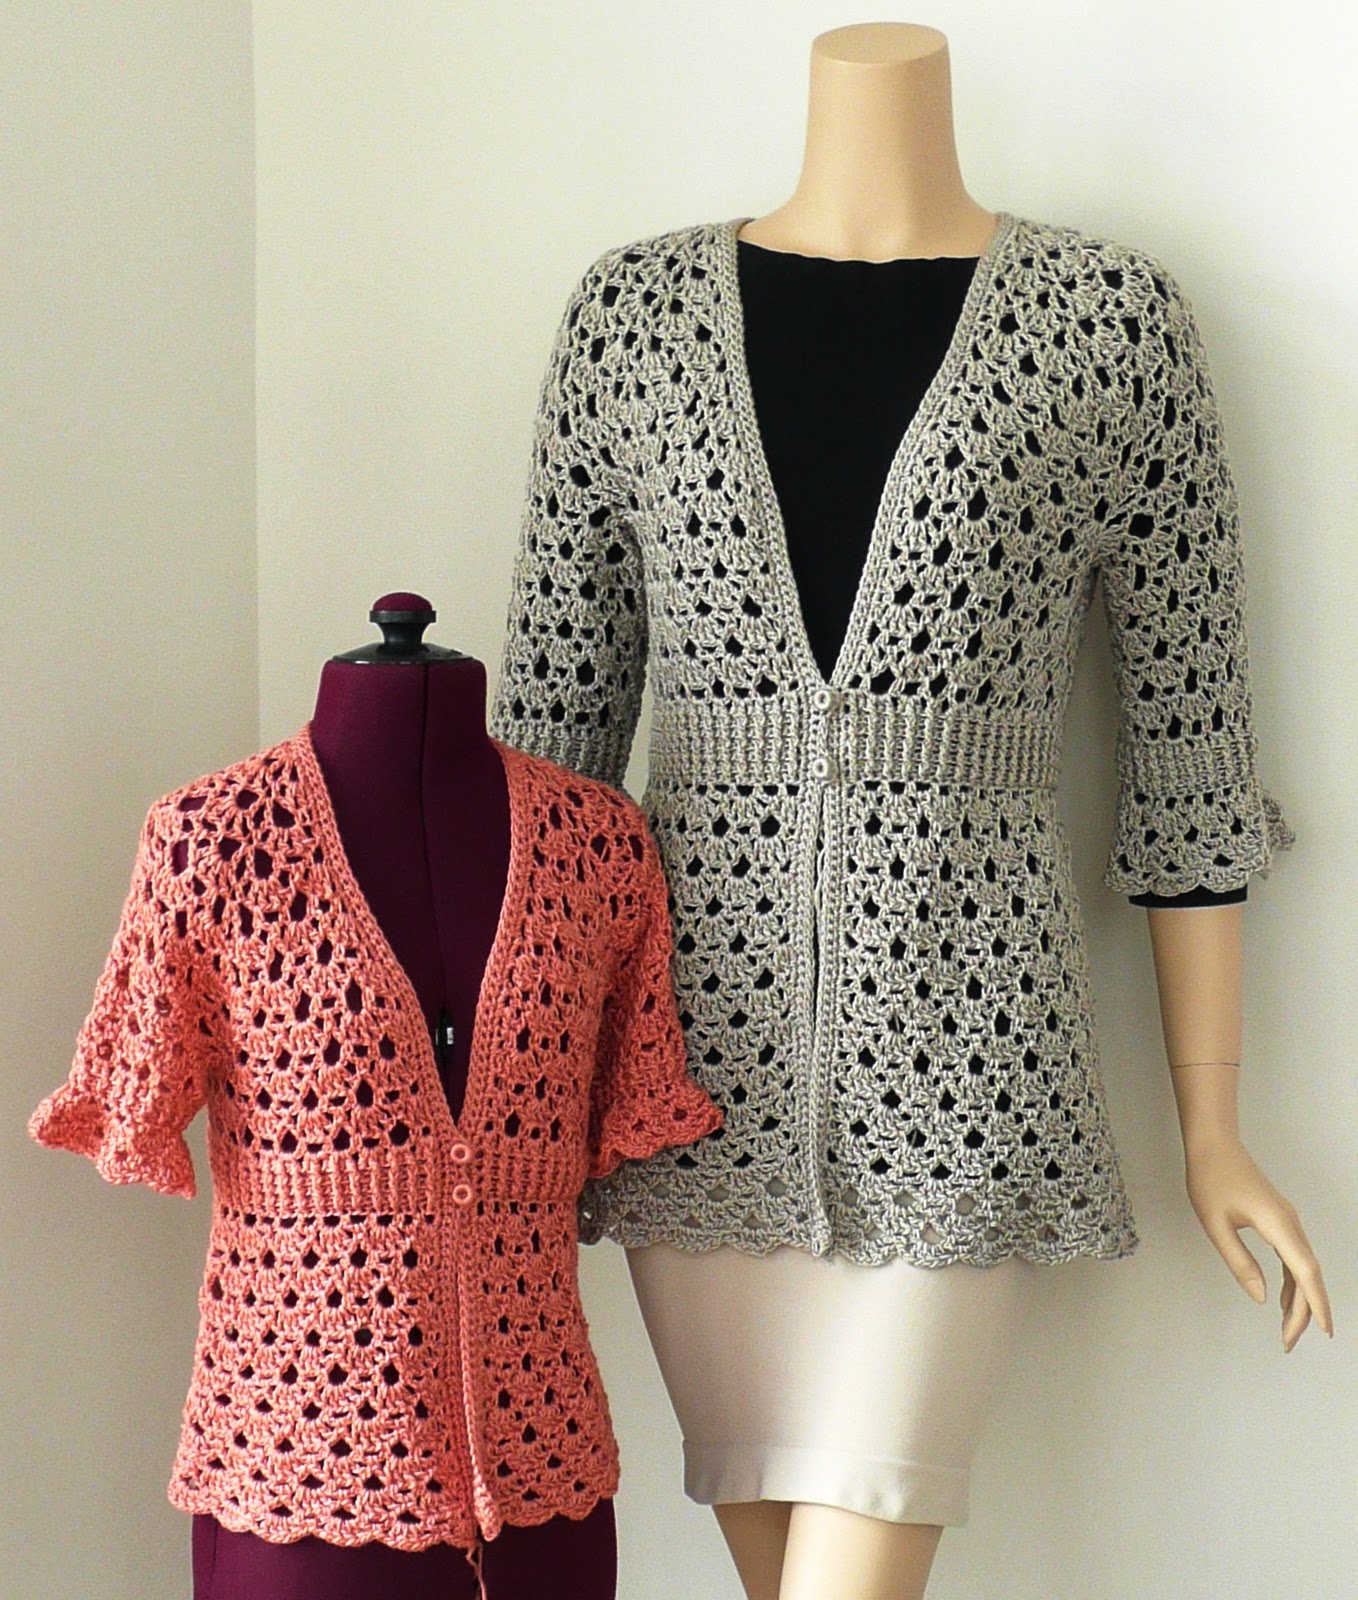
Chloe and Clarity Cardigans, Interweave Crochet, Spring 2010

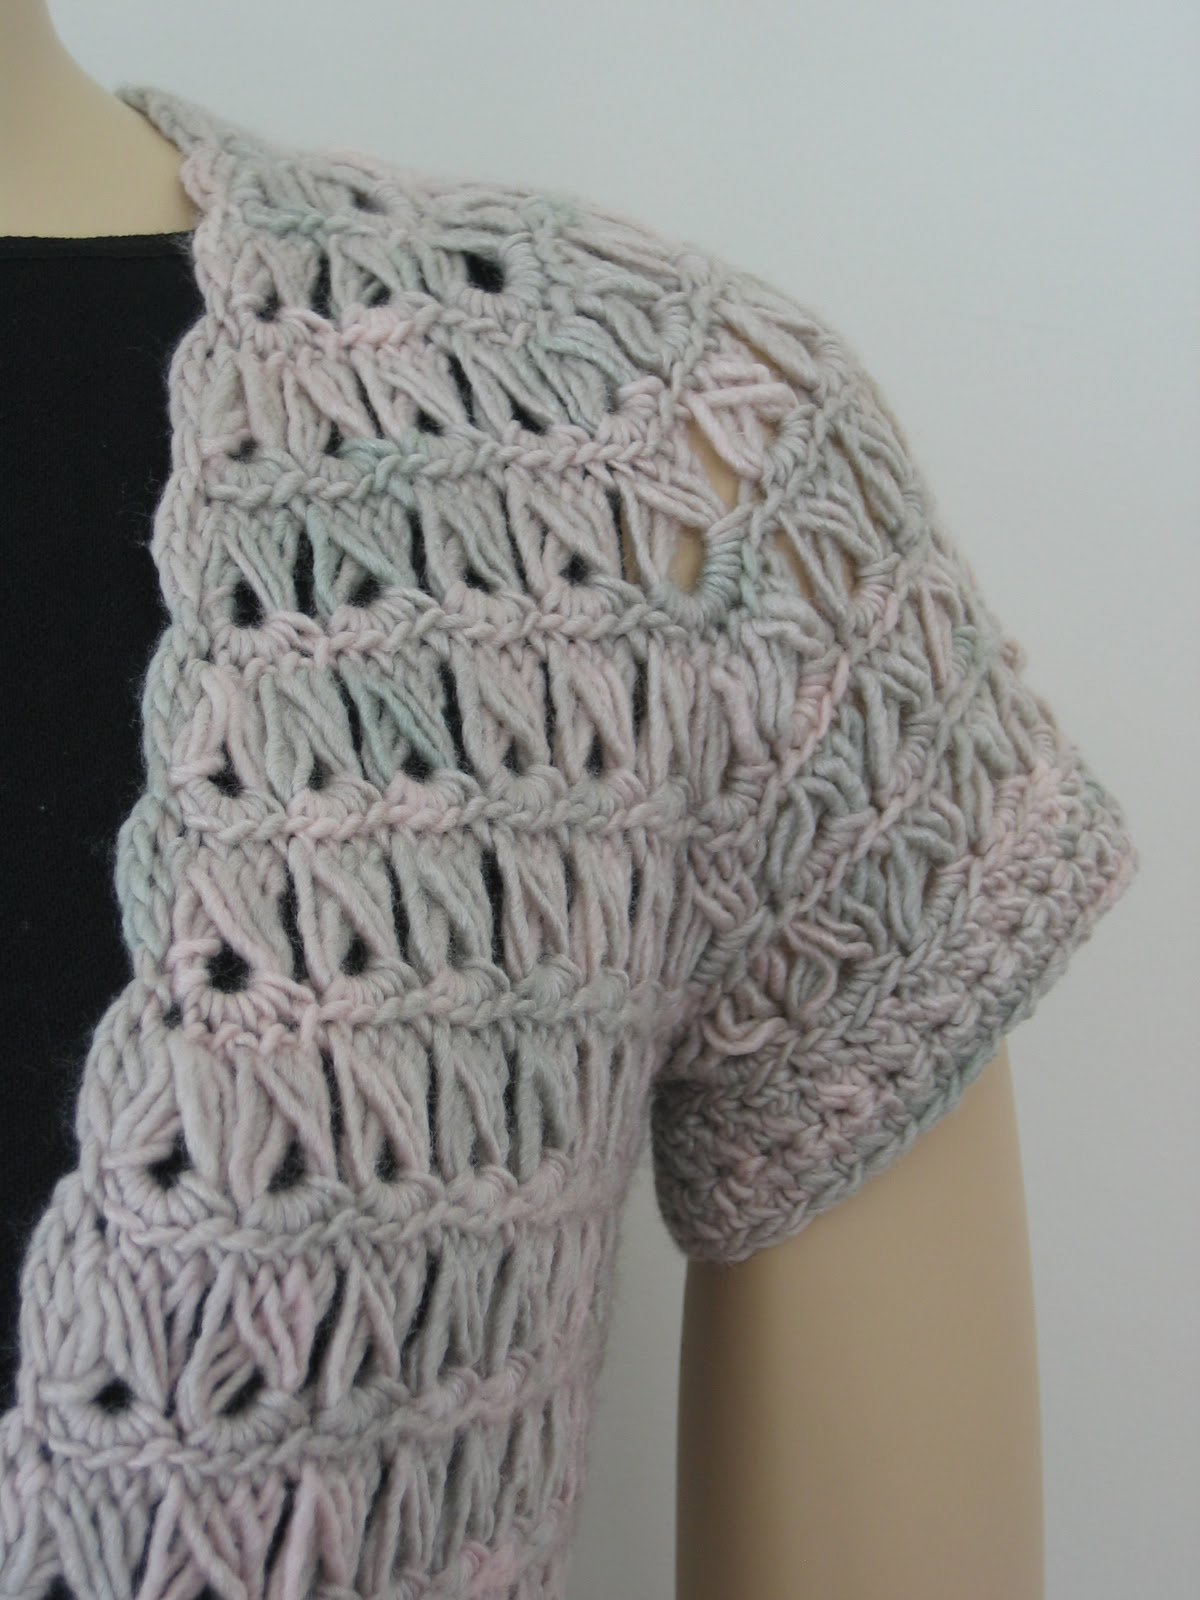
So today I am sticking my head out of my timeless tunnel and offering a few words to newbie crocheters. Meanwhile, for any avid crocheters who have ventured this far into the post, I will put up some images of designs I have out this season, sprinkled like fairy dust throughout this long tirade. Hey,  I do hope that you are coming to the craft as a result of reading or hearing about NatCroMo, and that the hype has sucked you in, because a lot of people have done a whole lot of work this month just to get to you. Perhaps you are a knitter or other fiber artist and you’re now looking to add crochet to your skill set.  Or maybe you’ve never before held a skein of yarn in your hands, but you’re attracted to this thing we do.  I have three words to say.  Crochet ain’t easy.

Tokyo Vest, Tahki City Crochet
Man, we all hate moments when we are made to feel unbalanced, stupid and foolish.  It’s like fussing with the back of your hair or trimming your bangs while looking in a mirror.  Don’t you always go the wrong way?  Doesn’t it make you feel dumb?  Or it’s like tying a bow tie on yourself.  It’s supposed to be exactly like tying your shoelaces.  But damned if the fact that you’re looking at it from the other direction makes it so much harder. Hey, my guy still can’t do it for himself.
Graceful Lacy Cardigan, Crochet Today, March/April

Our human pride begs us not to go there.  Avoid those situations that can only lead to awkwardness.  Life is too short to spend any of it undermining your ego.   So how can I convince you that my beloved craft is worth it?  There is no question that learning to crochet is often frustrating, with agonizing hours spent fumbling around and pitiful little to show for it.  At first you have to think about the movements of every fracking muscle in your hands and wrists as you struggle with using the hook and maintaining tension in the yarn.  And there’s the hitch.  Thinking.  What has to happen is that you must remove the cognitive process from the equation and fly on purely physical auto-pilot.

It’s like driving. I can get in my car and arrive at the supermarket and not remember driving there.  This is not about being careless, preoccupied, distracted or asleep at the wheel.  I am certain that it was uneventful, even pleasant, and that I have driven quite well and lawfully, but the trip was on total auto-pilot.  I am so used to my vehicle and the route to the destination, so accustomed to performing the actions of steering, braking, accelerating and adjusting for traffic and conditions, that I don’t actually think about any of it.  I just do it.

Marseilles Jacket, NaturallyCaron.com

Not having taught crochet a great deal, and with limited experience teaching absolute beginners, and not the slightest memory of actually learning to crochet as a girl (it might have been by osmosis!), I can still feel your pain.  I am the world’s worst student. That rascal Dee Stanziano, in her class Pushme-Pullyu, forced me to examine my so-called skills from a different perspective.  She made us crochet backwards, first with our other hand (for me that’s the left) and then with our regular hand.  It made me feel as though I didn’t know how to crochet.   At the time I am sure I cursed Dee and the devilishness of it all.  But it turns out the embarrassing experience in that class gave me a greater appreciation for what it must be like for a newbie.

The hands are eloquent when the brain is mute. The moment your body “gets it” and your brain stops thinking about each tiny motion and nuance, and you let go of the beginners’ mantra going round and round in your head (I particularly like “hook up, hook down, pull through”, but each teacher will dispense her own), that’s the epiphany.  The goal and the ultimate reward is getting to that point where your hands “know” what to do, smoothly and automatically.

Kylara, Crochet Lace Innovations, April 2010

So what will it take?  Another brand of teacher might admonish you to practice, practice, practice.  Wax on, wax off. That makes it sound so boring.  The word practice has such negative connotations.  Visions of working back and forth and back and forth with the same stitch though a gazillion yards of yarn.  Sort of like {shudder} swatching.   I prefer to say play.  Take up your hook and yarn and play, play, play.  The more you play the closer you’ll get to nirvana.

Melisande, Crochet Lace Innovations, April 2010

And then you can start feeling cocky.  Don’t worry about what you think you know or what skill level you’re at.  Pick a project that appeals to you.  One that has you drooling.  Try it.  Wing it.  Fly.  So what if you mess up.  So what if it’s not perfect.  So what if you have to learn stuff as you go.  There are all kinds of ways to find help, online tutorials, pattern support from designers and other crochters.  I hear all the time from fans on my forum at Ravelry, Doris Chan: Everyday Crochet (where I lurk), that sometimes the first time through one of my patterns is the learning curve.  They work and rip, work and rip some more and beat themselves up all the while. But, watch out!  The second one be brilliant.

As for how long will it take, it depends.  I have taught knitters to crochet in 15 minutes.  On the other hand it might be better for a student to approach crochet without any particular yarn experience or bias.  No habits to unlearn.  But here’s my belief.  If you can tie your shoelaces, you can crochet.  And when crocheting feels as natural as tying those laces, then you’ll understand what all the fuss is about. Do you trust me?

>Front Neck Extensions: Necessary Nuisances

>

Reader alert: The following is purely tech talk.  Casual or non-crocheting readers may skip this post. 🙂

It ain’t gene splicing.  It’s Foundation Single Crochet (Fsc) splicing, and it’s a handy way to create more fabric at the fronts of a garment while keeping the right-hand and left-hand fronts looking exactly the same.  I’ve been fielding a few questions from crocheters concerning this technique and fervently pray that the following exercise will help clear up some of your issues.

Many garment designs fit better if the front neck is lower than the back neck.  There are other ways of creating this front neck drop, but I really believe the method offered here gives the most balanced result.  Many of my garment designs are crocheted seamlessly from the top down beginning with a back neck foundation.  From the foundation, the yoke grows as it goes, with increases in stitch pattern that create raglan-type shoulder shaping.  Once you get to the level where you want the front neck to lie, it is necessary to add pattern repeats at each front neck edge.  My method requires you to finish off a row, then start the next row with new yarn, beginning the new row with a short foundation, splicing into the working row on the yoke, then ending the row with a short foundation.  I call these bits of foundation “front neck extensions”.  I could have called them “pangalacticgargleblasters”, but that word already has a totally different usage and although the term is highly descriptive, it is not descriptive enough of the crochet technique.  So “front neck extensions” it is.

Here’s an example.  Those who know me will be totally astounded that I swatched something.  Those who know me too well will know why I did it.  This is the cardigan design Cinnabar, from the book Everyday Crochet.  You are seeing the Yoke for size 40 through Round 3.

The blue things are wrapped yarn markers, anchored into the back neck foundation, flipped back and forth across the rows as you work them, marking the four increase points or “corners” of the yoke.  At this point you fasten off.  End the yarn.  Take out your scissors and cut that sucker loose.

With new yarn, make the Fsc required, then return to the piece, go along and work across the row as if nothing happened.  When you get to the other end, use your Fsc skills to add another little length of foundation.

In the following row (not shown, because I do have a life), you will fill in the front neck foundations with some stitch pattern, in this case V’s and Shells.  You now have the start of a round-neck cardigan yoke that is lower in the front neck, with right-hand and left-hand edges that can meet at the center front.  It all looks wonky right now, but trust me.  Once you finish that neck edge with some stitches or trim it will be beautifully and symmetrically rounded.

>PATTERN EXTRA: Lacy Top Cardi Adjustments

>OK. This was not as big a problem as I anticipated. What follows is crochet tech talk, strictly for readers who have requested a way to crochet the Lacy Top Cardigan with deeper armholes to fit. Everyone else will still have to wait for a happier post! 🙂

As I have mentioned in “Amazing Crochet Lace” and elsewhere, top-down garment construction allows you to try on the piece while you are crocheting. This is never an orderly fit. It is my experience that the body, particularly across the back, will seem sloppy and loose, while the underarm and armholes may feel tight and too high. Please consider that the fabric has a good deal of stretch, that crocheting the rest of the garment (particularly adding sleeves) will surely change the fit, and that blocking usually pulls everything longer. However, upon examining this pattern, I can see why you might want more breathing room in the armhole, particularly in the two larger sizes, L/XL (45) and 2XL (50). So here’s what I think.

Mercifully, all sizes complete the front neck shaping and the yoke increases before this adjustment happens. This lace stitch pattern has a four row repeat. The simplest way to add depth to the armhole without changing either the bust or sleeve circumference (once you have completed all shaping at fronts and corners, and before joining fronts and back at underarms) is to work four rows even in stitch pattern, putting you back at the same step. At that point you are ready to join the underarms in exactly the same way as written. However, four rows at this relaxed gauge will drop the underarm by approximately three inches. This will work well for the sizes L/XL (45) and 2XL (50). But may be too disproportionate for sizes XS (35) and S/M (40). I will address that later with a more involved solution.

Please refer to the pattern as published, as discussed in this post on July 8. To add 3″ to the yoke (armhole) depth, follow pattern as written, stop after Row 8 (9, 10, 10). Insert these four rows.
Size XS: Work Pat Row 4, then Pat Rows 1-3.
Size S/M: Work Pat Rows 1-4.
Sizes L/XL (2XL): Work Pat Rows 2-4, then Pat Row 1.
Return to instructions as written, continue with Row 9 (10, 11, 11)

Coming soon, pattern extras to grant deeper (but not this deep) armholes and a way to create more ease for generous upper arms without changing the bust circumference.

>Tirade #5

>Or is it # 4? Whatever. Reader, beware. The following tirade is not for the crochet dilettante. Crochet obsessed only read on. Everyone else can chalk this up to my being crabby and old and wait for the next happy post.

Pattern grading, or the task of extrapolating and writing crochet garment pattern instructions in multiple sizes, is a big pain in the butt. Universally, it is considered the worst part of a design job. Any designer who claims otherwise is either 1) fooling him/herself, 2) being paid so fracking much that he/she can ignore the pain, 3) being paid so much that he/she can turn around and pay someone else to do the grunt work, or 4) lying.

Pattern grading is SO awful that the term has seeped into crochet-designer-speak as a codeword for the worst possible case nightmare scenario. For example, if I were to ask, “How did that hip replacement surgery go?”, the reply “Not as bad as pattern grading” could be expected and understood.

In my job I make one real life crocheted garment sample, a singular and perfect thing, a joy to create and behold. Then I am obliged to beat my head against the wall until that sample is interpreted as a set of clear, concise crochet instructions for up to six sizes. My brain and temperament are well suited to the former task and not one iota interested in the latter. At the crux of the matter is the fact that I suck at counting. Who wants to get bogged down in the specific numbers? Does that raglan shoulder shaping increase mathematically, geometrically, exponentially? How many stitch repeats will that mean in size 2XL?

I’m a crocheter, not an actuary. My son is an actuary. He spends his working life in a cubicle (real or virtual) crunching numbers. He researches, compiles, and interprets statistical models, charts and reports filled with correlated, corresponding, codependent, confusing data supplied by clients concerning real life people. I think he enjoys his job in a scary, geeky way. I sometimes wonder if he is indeed my son, know what I’m saying? Just kidding, Nick.

Do you know that there are crochet designers who aren’t required to produce a single garment sample, write a single word or crunch a single armhole depth? These exhalted few need only supply a sketch and a stitch swatch in order to get money for a design. As wonderful as this sounds, I wouldn’t want to live there. The physical act of working with hook and yarn, the challenge of shaping and finishing each new garment concept, the satisfaction of turning the purely imagined into something tangible and wearable, these are priceless jewels, the rewards of my job. I would not, could not, delegate/relegate them to another crocheter. And since each project is a unique piece of me, I can’t hand over the nasty bits either, the writing and sizing, even though that would make my life a lot happier.

Now that you know I am not by nature a number cruncher, you can understand how I have no simple solutions to the problems of pattern grading or the alteration of existing pattern sizes to accommodate other than average proportions. I can’t point you to a fancy software program or a secret formula. I have no magic bullet. Everything I know about this subject I learned the hard way, through experience, time, trial and error.

We designers are admonished by our professional peers to never give anything away for free, not of our work or of our expertise. Our time and talents are valuable, I am scolded, so don’t offer free pattern support. You did your job, got paid. Done. But I am often asked by crocheters, readers and fans for advice. In order for them to get happy results I’d have to completely rework, rewrite and reinterpret, row by row, major sections of the pattern grading. How can I make this top longer, is it possible to shape the waistline, I need deeper armholes, these sleeves are too tight, my neckine is too loose, I have too many shell repeats, what the frack is a Yoke Row, help, help, HELP!

And I do. Help people. Dispense free pattern support. All the time. It’s a little about being well-thought-of by my readers. I don’t mind being the hero in these situations. But it is a LOT about spreading the joy. Once you help a fellow crocheter get unstuck, reach that genuine “AH-HA!” moment and eventually finish a project that fits well, looks great and gets plenty of admiration, the satisfaction is not just on her part. That’s part of my own job satisfaction, is it not?

So what I am getting at is, in a while, in response to readers, I will take the time to post a little pattern extra that concerns the Lacy Top Cardigan.

>Killer Brownies

>Happy Birthday to me!

Here’s the recipe for the brownies I shared one night at the Big Bar on Two at TNNA Columbus 2009. Incredibly moist and meltingly smooth, these brownies should be kept refrigerated to extend freshness. They also freeze well. But that assumes there will be any left around to store. This pattern… uh, recipe… tells exactly how I make them, with specific ingredients to get the same results. Swap out at your own risk!

Skill Level No-Brainer

Size 8” by 8” square or 9” round, 1″ deep; to serve a gang of crocheters, unless you are Ellen Gormley, in which case serves two

Materials
14 tablespoons (7 ounces [200 g]) unsalted butter, cold, in chunks (Land O’ Lakes)
3 ounces (85g) chopped bittersweet or dark chocolate (Ghirardelli semi-sweet dark)
1/2 cup plus 2 teaspoons (1.75 oz [50 g]) unsweetened Dutch process cocoa, lightly spooned into cup (Pernigotti, an Italian cocoa with a touch of Tahitian vanilla bean)
1 cup plus 3 tablespoons (8.25 oz [238 g]) granulated sugar
3 large eggs, room temperature
2 teaspoons vanilla extract (Penzey’s Double Strength)
3 ounces (85 g) cream cheese, softened (Philadelphia brand original)
1/2 cup (2.5 oz [71 g]) all purpose flour, stir flour in container, dip cup, lightly sweep off excess (King Arthur)
A pinch of salt

Tools

Baking pan, metal, 8” by 8” square (or alternately 9” round), 2” deep
Aluminum foil, 8” by 16” strip or parchment paper
Nonstick baking spray (Pam for baking)
Microwave for melting stuff
Microwaveable 2-cup measure or medium bowl
Stand mixer with paddle attachment, great to have but not critical (KitchenAid), or hand-held mixer plus a large mixing bowl
Thin bladed spatula for spreading batter
Wire cooling rack
Toothpick or cake tester

Gauge not critical

Instructions
Batter
Preheat oven to 325 degrees F. Prepare 8” square baking pan by lining with aluminum foil, allowing a few inches overhang on sides for lifting brownies later. Alternately, line the bottom of the 9” round pan with a circle of parchment. Either way, spray sides and bottom of pan with baking spray (or grease lightly with a little butter or vegetable shortening).

Row 1 (RS): In a microwaveable 2-cup measure or medium bowl, place butter and chopped chocolate, microwave on high power until melted, approximately 1 1/2 minutes, stirring 2 or 3 times.
Row 2: Pour the butter mixture into a large mixing bowl (bowl of stand mixer fitted with paddle attachment) and beat in the cocoa — 15 seconds at medium speed.
Row 3: Beat in the sugar until it is incorporated — another 15 seconds.
Row 4: Beat in the eggs and vanilla until incorporated — about 30 seconds more.
Row 5: Beat in the softened cream cheese until you can only see tiny bits — about 15 seconds more.
Row 6: Sift in the flour and salt and mix only until the flour is fully moistened — a few seconds at low speed.
Row 7: Scrape the batter into the prepared pan and spread it evenly with spatula.

Baking
Row 1: Place pan in the middle of oven, bake for 30 minutes. Batter should be set around the outside but the top should still look moist and shiny in the center. A toothpick inserted 1 inch from the edge will come out clean.
Note: Avoid overbaking.
Row 2: Place the pan on a wire rack and cool completely. That’s the hard part, cause this requires a couple of hours of smelling chocolate but not being able to eat it.

Finishing
With clean spatula, loosen brownies from sides of pan. Using the foil overhang, lift the brownies out of the pan. Alternately, turn the brownies out of the round pan, peel the parchment off the bottom of the brownie round, then invert so the top is again on top.
Weave in ends. Block brownies into 2” square servings, 16 squares. Or one huge shark-bite for Ellen. Enjoy!