For a compete survey of related techniques, purchase and view the webinar, Chainless Foundations, now available on demand.
A technique tutorial by Doris Chan
I have recently become entranced by the infinity or mobius style of cowl design. The fabric grows from the center outwards in a continuous figure 8. The following explanation and picture tutorial is being provided for all who have been petrified by certain of my designs, including the Valley Cowl from WEBS and DJC: Snow Day, and may also be generalized for other applications.
The cowl begins in the middle with a foundation.
Fdc (Foundation Double Crochet): This creates a beginning row of double crochet, each with its own chain at the bottom, which forms the center strip of an infinity style or mobius cowl.
Begin with a slip knot, ch 4 (equals first “ch” and first “dc”). Place a marker or safety pin in the 4th ch from hook (in other words, in the first ch made). For the next stitch, YO, insert hook in 4th ch from hook, *YO and draw up a loop (3 loops on hook), YO and draw through one loop on hook (equals the chain), [YO and draw through 2 loops on hook] twice (equals the dc)*. For the following stitches, YO, insert hook in the ch at the base of the previous st, through the face of the chain and under the nub at the back of the chain, under 2 strands (leaving the 2 strands at the chain edge), repeat from * to * for length as directed (TUTORIAL 1, 2, 3, 4)
Connecting the Foundation into a Mobius Round:
Turn foundation over so dc edge is on top, careful not to twist foundation yet. (TUTORIAL 5)
Bring last dc together with beginning end (TUTORIAL 6), give beginning end a half twist, matching last loop on hook with marker in first ch (TUTORIAL 7, 8 ), sl st in first ch (TUTORIAL 9, 10). I like to connect up the row edges of the foundation strip before continuing. Keeping hold of the ends so they don’t untwist, turn foundation upside down (TUTORIAL 11), rotating to work across the row edge of the ch-3 beginning dc, sl st in each of the 3 chs that form the beginning dc (TUTORIAL 12), then reach over and sl st in the foundation ch at the bottom of the last dc (TUTORIAL 13), thereby connecting the top and bottom of the foundation (TUTORIAL 14, 15). Begin working across the “ch” side of foundation.
TUTORIAL 1 — The foundation is a strip. See the marker in the first chain made. As you are crocheting it, the strip sort of hangs down from the hook, with the chain edge to the left. Make sure you are inserting the hook so that two strands are running along that chain edge.

TUTORIAL 2 — The chain edge should look like the loops of a chain.

TUTORIAL 3 — The dc edge looks just like normal dc top loops.

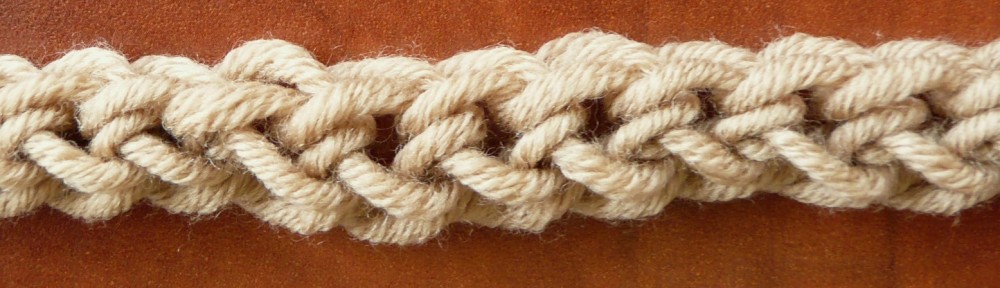
TUTORIAL 4 — Here’s a reduced sample of your strip just as you’re done crocheting. See the marker in the first chain made, see the next 3 beginning chains.

TUTORIAL 5 – Turn foundation over so dc edge is on top. This puts the hook in ready position.

TUTORIAL 6 — Bring last dc together with beginning end, not twisting foundation yet.

TUTORIAL 7 — Give beginning end a half twist; which direction is not critical.

TUTORIAL 8 — Matching last loop on hook with marker in first ch

TUTORIAL 9 — Reach over, insert hook in marked first chain.

TUTORIAL 10 — Sl st in first ch.

TUTORIAL 11 — Turn the piece upside down.

TUTORIAL 12 — Sl st in each of 3 chs.

Tutorial 13 — Reach over and sl st in first ch of other edge.

TUTORIAL 14 — Connected!

TUTORIAL 15 — Ready to continue, with half twist!
 DJC Foundation Double Crochet Tutorial
A link to the pdf version of this stuff.

Pingback: I’m a Valley {crochet} Girl! | Doris Chan: Everyday Crochet
Pingback: Mobius Much? | Neatly Tangled
love this and plan to try it – I have been using a chain stich – with a single chain in the back loop – half twist to join and continue to sc in the back loop of the rest of the line but I would like to try this as a beginning. thanks for the pictures. I am currently working on translating the mobius basket (knitted) – into a crochet design.
Totally clear instructions for totally twisted crocheting! Thanks!
The chain 3 is on the left in the one picture, but once you turn the work upside down, the chain 3 is on the right. I cant get mine to do that. Maybe you flipped the picture? I understand the concept, but my yarn is coming from the wrong side for it.=
I thought so, too, until i realized you don’t FLIP your work from front to back. “Turn the piece upside down” means to keep the front side facing you, and turn the piece around like you’d put it down on a lazy suzan and gave it half a turn. That moves the marker to the right side of your work, ready for slip stitches.
thank you for the tip